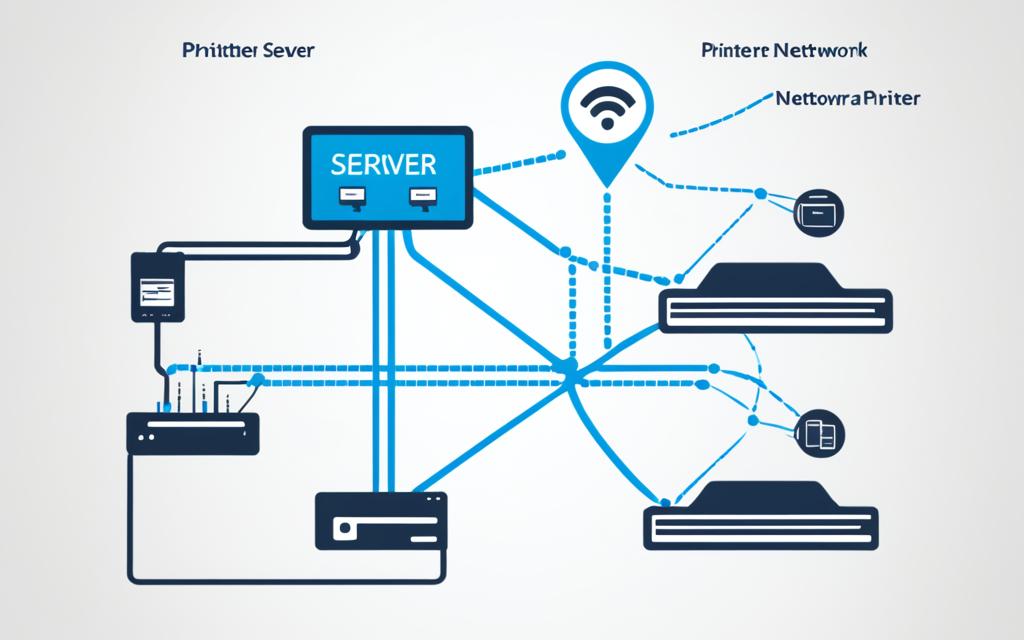
To set up a network printer, follow a few simple steps. You can connect to a LAN/Ethernet or a secure Wi-Fi network. We’ll guide you through mapping a network printer and confirm printer details for your agency network.
Start by confirming the printer details. You’ll need the printer name, location, and IP address. Having this info right is key for mapping the printer on your network. Make sure you know the agency print server network path for a smooth setup. For help, call OCTOhelps at (202) 671-15661.
Key Takeaways: – Confirm the printer details, including the printer name, location, and IP address. – Ensure you have the correct agency print server network path. – Contact OCTOhelps at (202) 671-1566 for additional assistance with mapping network printers.
Next, we’ll give you step-by-step instructions on confirming printer details and mapping it in your agency network.
Key Takeaways: – Confirm the printer details, including the printer name, location, and IP address. – Ensure you have the correct agency print server network path. – Contact OCTOhelps at (202) 671-1566 for additional assistance with mapping network printers.
Make sure you know the network printer’s name. You can find it on the printer or get it from your IT team. It’s vital to type it in right to connect without problems.
You’ll also need the printer’s IP address. This is its unique ID on the network. Look for it in the printer settings or the manual. Or, ask the manufacturer if you’re stuck.
After getting the printer’s name and IP, note the agency print server network path. It usually starts with two backslashes and the server name. This helps map the printer right on your network.
If you’re not sure about any details, reach out to OCTOhelps support. They can help you get everything right before you set up the printer.
Getting the printer details right is key for a smooth setup. With the right name, IP, and network path, the printer will be easy to find and use by everyone.
Printer Details
Importance
Printer Name
Accurate entry required to avoid connection issues.
IP Address
Unique identifier for the printer on the network.
Agency Print Server Network Path
Ensures correct mapping of the printer on your network.
Confirming these details lays a strong foundation for a successful printer setup. With this info, you’re ready to move on to the next steps for a hassle-free setup.
Now that you have your printer details, it’s time to open the Print Server application on your computer. This tool helps you manage and set up printers on your network for smooth printing. Here’s how to access the Print Server:3
Click on the Windows Start menu and type “Print Management” into the search bar. Press Enter to open the Print Management console.
In the Print Management console, you’ll see options and settings for your print servers and printers. Look through the tabs to see what features and settings are available.
Under the “Print Servers” folder, find and expand the “Local Server” option.
This shows a list of print servers on your computer. Pick the print server you want to access its settings and printers.
Opening the Print Server gives you control over your network’s printing. You can check printer status, manage drivers, and set up advanced settings for better performance and security4.
Remember, the Print Server works differently based on your operating system. Always check your system’s manual or official sources like Microsoft’s support articles for detailed instructions and compatibility info34.
An image depicting the Print Server console, where you can manage printers and configurations. Now that you’ve opened the Print Server, you’re set to explore your network’s printers and their settings. This tool makes managing print tasks easier, giving you a single place to handle everything4.
For more on managing network printing and setting up your print server, check out Microsoft’s support articles on printer management and sharing printers.[1][2][3]. These resources offer great advice and tips for managing your print server and sharing printers well35.
Locate and Map Printer
Setting up a network printer starts with finding and mapping it to your device. This makes printing documents easy and lets you use the printer’s features. Here’s how to do it:
In the Print Server window, you’ll see a list of network printers in your agency6.
Search for the printer by name, location, or IP address.
Double-click on the network printer you want to add, and an installation window will appear6.
After you’ve found and mapped the printer, your computer and the printer connect. This lets you send print jobs and set up printing settings. It’s key for smooth printing in your work or home setup.
“Print mapping is a multi-step process that often needs user education to avoid problems. This reduces IT help and print management tasks.”6
Streamlined Printer Mapping with PrinterLogic
PrinterLogic’s Self-Service Printer Installation Portal makes mapping printers easy and quick. It’s great for businesses, cutting down on print helpdesk calls and boosting productivity.
This portal lets users of all skill levels find and install printers with just a click. It makes printing more efficient and gives users more control. It also cuts down on IT work and saves time in connecting to printers.
“PrinterLogic’s Self-Service Printer Installation Portal makes printer mapping easy, cutting down on helpdesk calls. It lets users of all skill levels add printers with one click. This boosts efficiency and user power. PrinterLogic’s tool saved time and money for companies like Georgia System Operations Corporation and New Pig Corporation.”6
With PrinterLogic’s tool, finding and mapping network printers is easy and saves time and resources for businesses.
Print a Test Page
After setting up your network printer, make sure it works by printing a test page7.
To print a test page, follow these steps for the operating system you use:
For Windows 11, Windows 10, Windows 8.1, Windows 8, and Windows 77:
Open the Control Panel or go to Settings.
Select the Printers & scanners option.
Find the new network printer in the list and click on it.
Click on Manage and choose Print a test page.
Printing a test page checks if your network printer talks to your computer right. It also lets you see if the printer settings are correct. Plus, it helps you check the print quality to make sure the printer works well.
If you have trouble printing the test page or need help, reach out to the OCTOhelps team7. They can help with printer mapping, configuration, or functionality issues.
A test page is a great way to check your network printer’s setup. It’s a quick way to make sure the printer is ready for use.
Share the Printer on the Primary PC
To share a printer on the primary PC, you have several options. Start by going to Settings or Control Panel and pick Printers & scanners. Then, select the printer you wish to share from the list.
Next, open the Printer Properties by right-clicking on the printer and choosing Properties. In this window, head to the Sharing tab.
In the Sharing tab, you’ll see how to turn on printer sharing and set a share name. This lets other network users connect and print to this printer. Pick a share name that’s easy to remember for others.
After setting up sharing and naming the share, hit Apply and OK. Your printer is now shared and ready for other devices to connect to.
The steps to share a printer might change based on your operating system and printer type. But the steps we’ve shared work for many Windows systems. They give you a basic way to share your printer.
“Sharing a printer on the primary PC can lead to financial savings and productivity gains for organizations.”8
Connect the Shared Printer to Another PC
To connect a shared printer to another PC, follow these easy steps:
1. Go to the “Settings” or “Control Panel” on the secondary PC5.
3. Under “Add printers & scanners,” choose “Add a printer or scanner.”54. Look for the shared printer you want to connect to from the list. If it doesn’t show up, you can manually enter the computer or device name of the primary PC and the share name of the printer5.
5. Follow the prompts to complete the printer installation process5.
Connecting a shared printer to another PC is easy and lets you use the printer from many devices on your network. Just follow these steps to connect your secondary PC to the shared printer5.
The process might change based on your operating system and printer type. Check the printer’s manual or online help for your specific setup. Make sure you have the printer drivers ready for the secondary PC to work properly9.
If you’re having trouble setting it up, look at the troubleshooting guide or contact the printer maker’s support. With the printer linked to your secondary PC, you can print without any limits9.
When adding a shared printer, make sure only one computer shares it, usually the one it’s connected to via USB. Sharing from more computers can cause problems and affect printing. Stick to the recommended steps for smooth printer sharing across your network9.
After connecting the shared printer to your secondary PC, you can use it like it’s your own. This means you can print documents, photos, and more from your secondary PC without needing another printer5.
Also, check out the settings and options in the printer software or control panel. They might have extra features you can customize. By exploring these, you can make your printing better fit your needs5.
Setting up your primary and secondary PCs correctly is key for easy printer sharing. Take your time with the steps in this guide. Look at the stats in10and5 for advice from experts.
Set up Sharing Settings
To make sure devices can easily connect to the shared printer, set up the sharing settings right. Enable network discovery and file and printer sharing to let devices find and use the printer11.
“In order to set up the sharing settings, navigate to the Network & Internet or Control Panel settings.”
In the Network & Internet settings, find and click on “Network and Sharing Center.”12
Under the “Private” section, click on “Change advanced sharing settings.”12
Make sure network discovery and file and printer sharing are on in the advanced settings12.
Turning on network discovery helps devices find your shared printer easily. It makes connecting without entering printer details smoother11.
With file and printer sharing on, other devices on the network can use the shared printer11.
Setting up sharing settings right makes printing and working together in your network easier. Next, we’ll see how to set up and share your printer on the main PC and link it with other devices.
Use Group Policy to Restrict Printer Installation
To keep printing safe and under control, it’s key to stop users from adding printer drivers on their own. Using Group Policy is a great way to do this.
Start by opening the Group Policy Editor on the server. Then, go to Computer Configuration > Policies > Windows Settings > Security Settings > Local Policies > Security Options.
Find the “Devices: Prevent Users From Installing Printer Drivers” setting in Security Options. Turning this policy on stops users from adding their own printer drivers. It lets you manage printer setup with Group Policy instead.
This policy has many benefits. It makes managing printer setups easier and keeps them up to standard. It also lowers the chance of problems from drivers installed by users, keeping printing stable.
Group Policy also lets you set up printers for different groups based on their needs. This means you can give certain printers to specific groups. It makes sure people only get the printers they need for their jobs.
Example:
For example, the HR_Printers group gets the HR-OfficeJet9025 printer, while the Marketing_Printers group gets the Marketing-HP4200 printer13.
Using Group Policy to set up printers makes things easier for users and less work for IT. It cuts down on helpdesk calls and makes sure everyone gets the same setup. This makes things run smoother and more efficiently.
To add printers with Group Policy, you need to follow a few steps. First, make Active Directory Security Groups for different printer needs. Then, make a new Group Policy Object (GPO) for printer setup. Finally, reboot the computers or run “gpupdate” to apply the GPO. If you need more printers, just repeat the process.
Example:
Create groups for printers based on department or need, like HR_Printers or Marketing_Printers13.
Create a new GPO and link it to the Users OU to control printer setup13.
Go to User Configuration > Preferences > Control Panel Settings > Printers in the GPO.
Add shared printers to the GPO, setting up printer details and connections13.
Run the “gpupdate /force” command on the computers to apply the GPO13.
Test the printer setup to make sure it works well13.
Using one GPO for all printers makes managing them easier and cuts down on extra work. This approach makes keeping printers up to date simpler and more consistent across the company.
Note: Group Policy Preferences with item level targeting can improve printer setup even more. This lets you target printers more precisely, based on user or computer details13.
In summary, using Group Policy to control printer setup gives you better security and easier management of printers. By setting up the right policies, you can keep printing safe and stable. Plus, automating printer setup with Group Policy makes things smoother for everyone, boosting productivity and satisfaction13.
Consider Network Security Measures
Protecting your printers is as crucial as securing your computers and devices. Using Access Control Lists (ACL) on the switch port where the printer connects helps. This way, only certain devices like DHCP and print servers can talk to the printer. This adds a strong layer of protection to your network and keeps out potential threats14.
Printer security is key to network safety. Modern printers connect to the Internet, making them vulnerable to cyber threats. Threats like data theft and hacking can risk your network and sensitive info14.
Managed print services can help reduce security risks and boost efficiency. They offer advanced security to protect your printers. It’s important to use strong passwords and keep your printers updated to prevent breaches. Teaching users about printer security also helps keep your network safe14.
Printer tampering is a big concern for network security. Unauthorized access can lead to data breaches. To prevent this, set up access controls and security settings for printers. Encrypting print jobs and avoiding printer storage of print history also helps secure sensitive info14.
Creating a policy against lost printouts and teaching users about print reduction can improve security. A strong network security plan should include printer security. Protecting your printers is key to keeping your network and data safe1514.
Printer Security Best Practices
Best Practices
Description
Campus printers should not be exposed to the public Internet.
Prevent unauthorized access by keeping campus printers within the network.
Use RFC1918 private IP address space to restrict access to printers to campus hosts only.
Control access by limiting it to specific IP addresses within the campus network.
Implement IST network firewall services to restrict access.
Add an extra layer of security by using network firewalls to control printer access.
Configure printer’s ACL to restrict access by subnet or device.
Use Access Control Lists (ACL) to define specific subnets or devices that can access the printer.
Disable the default gateway in the IP configuration to disable Internet routing.
Prevent potential routing issues and unauthorized access by disabling the default gateway for printers.
Change default passwords for administrative control panel webpage.
Strengthen printer security by modifying default passwords and using strong, unique passwords.
Use encrypted connections like “https://” when accessing the printer administrative control panel.
Ensure secure communications by using encrypted connections when accessing printer admin panels.
When securing your network, don’t forget about printer risks. Hackers can change addresses, reroute print jobs, and gain unauthorized access. This can lead to attacks and malware. Disable unnecessary protocols and update your printers regularly to stay safe1416.
Choose printers with strong security features for your organization. Home printers may not be secure enough for sensitive data. Business printers with data protection can boost your security. If you’re at UC Berkeley, the UCSF Print Management Program can also help1416.
If you have security issues with printers, contact IT or Information Security for help. Quick action can keep your printing safe16.
Conclusion
Setting up a network printer takes a few steps for smooth printing across your network. Start by checking the printer details and installing any needed software17. Next, open the print server and find the right printer17. After that, map the printer to your computer and print a test page to check the connection17.
To share the printer, share it on the main PC and connect it to other PCs through settings or the control panel17. Use Group Policy to limit printer installation and better manage printing18. Create a GPO, pick the right OU, and use Print Management to make printing easy for everyone18. Make sure the printer shows up for users in the chosen OU18.
Network admins also deal with IP address issues and network mapping helps fix these problems and find where things go wrong19. Keeping track of your hardware helps predict when you’ll need to upgrade and keeps your network safe19. Adding IP addresses, locations, and use details to network maps makes finding printer settings easier19.
By taking these steps and focusing on security, you can map a network printer well and improve printing in your organization. If you need more help, check out extra resources or get help from OCTOhelps for any issues you run into.
FAQ
How do I map a network printer?
First, make sure your computer is on the LAN/Ethernet or secure Wi-Fi. Know the printer’s name, location, and IP address. Remember the print server network path. For help, reach out to OCTOhelps.
What printer details do I need to gather before mapping a network printer?
You’ll need the printer’s name, location, and IP address. Note the agency print server path, which includes the server name with two backslashes. If unsure, OCTOhelps can assist you.
How do I open the Print Server application on my computer?
Open the Print Server app with the printer details ready. Type the server name with backslashes and click OK. This shows the printers on the server.
How do I locate and map a network printer?
In the Print Server window, find the network printers in your agency. Search by name, location, or IP. Double-click the printer to install it.
How do I print a test page after mapping a network printer?
After installing, print a test page to check if the printer works. Go to the Printers & scanners window. Select the printer, click Manage, and then Print a test page. For help, contact OCTOhelps.
How do I share a printer on the primary PC?
To share a printer, go to Settings or Control Panel. Choose Printers & scanners. Select the printer, go to Printer Properties, and enable sharing. Customize the share name if you like.
How do I connect a shared printer to another PC?
Connect a shared printer by going to Settings or Control Panel. Add a printer or scanner. Choose the shared printer or enter the primary PC’s name and printer share name. Follow the prompts to install the printer.
How do I set up sharing settings for a network printer?
Set up sharing by going to Network & Internet or Control Panel settings. Turn on network discovery and file and printer sharing in the Private section. This makes the printer accessible to other devices.
How do I use Group Policy to restrict printer installation?
Use Group Policy to limit printer driver installation. Go to the Group Policy Editor. Enable “Devices: Prevent Users From Installing Printer Drivers” in Security Options. This controls printer installation through Group Policy.
What network security measures should I consider for a network printer?
Use Access Control Lists (ACL) on the switch port for the printer. This limits printer access to specific devices like DHCP and print servers. Network security measures ensure only authorized devices can connect to the printer.
How do I map a network printer successfully?
Mapping a network printer means checking details, opening the print server, and mapping the printer. Print a test page to confirm it works. Share the printer and connect it to other PCs using settings or control panel. Use Group Policy and network security for added safety. OCTOhelps can help if you run into problems.
Unlocking a SCHOK phone can be a great way to switch network providers, use your phone internationally, or increase its resale value. This guide will provide step-by-step instructions on how…
Unlocking your BLU phone lets you use any SIM card and enjoy different carriers or travel abroad. This guide will show you how to unlock your phone using UnlockBase. You’ll…
The Zeus Network is now on PlayStation, giving users a new way to enjoy their favorite shows and series. It’s easy to get into the action with just a few…
Network management tools are key to keeping networks running smoothly and reliably. They let IT pros keep an eye on and manage networks well. This makes them a must-have in…
The Project Object Model (POM) is key to Maven, a tool for automating builds. It’s used for managing and building Java projects. The POM file, an XML file, holds all…
A network device is key in linking an end device to the network. It helps send data, keeps the network safe and fast, and boosts security. Common devices include routers,…