Mapping a network drive makes it easier to access shared files on a network. By assigning a drive letter to the shared folder, it becomes as accessible as any local file on your system. This simple step can save time and make your work life smoother.
In business environments, administrators often recommend or require users to save data on network servers rather than local systems for better security, easier backups, and simplified collaboration. For detailed steps on setting up a network connection, you can refer to resources like this tutorial. Understanding network drive mapping is essential for improving workflow efficiency by providing quick access to shared resources.
By mapping a drive, users can enjoy seamless remote file access, making it an essential skill for both casual users and IT professionals.
Mapping a network drive is a simple yet powerful tool for accessing shared files. It’s a process that allows users to access files and folders on a remote server or computer as if they were stored locally on their own device.
What Is a Network Drive?
A network drive is a shared storage location on a network that can be accessed by multiple users. It’s essentially a folder or directory on a server that has been made available for others to use. By mapping this drive, users can access its contents directly from their File Explorer or Finder, just like a local drive.
Mapping network drives offers several benefits, including:
Quick and consistent access to shared resources without navigating complex network paths.
The ability to work with network files as if they were stored locally, using familiar applications and workflows.
Simplified file paths through the use of simple drive letters instead of lengthy UNC paths.
By mapping a network drive, users can enjoy seamless access to shared files and folders, enhancing collaboration and productivity.
How Do You Map a Network Drive in Windows
Mapping a network drive in Windows is a simple task that enhances your file access capabilities. This process allows you to access shared files and folders on a network as if they were on your local computer.
Using File Explorer Method
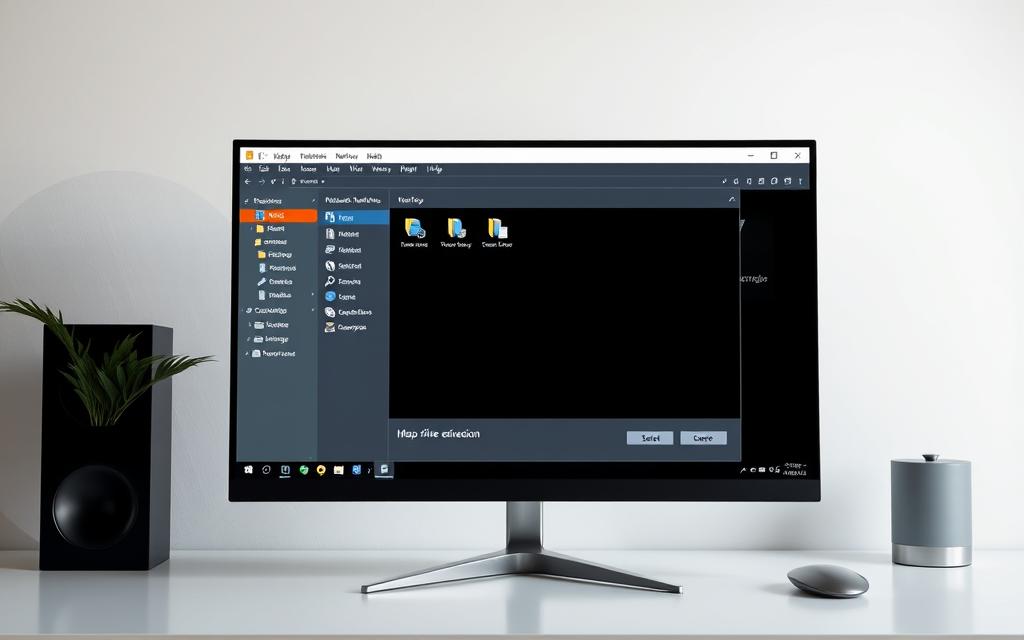
The File Explorer method is one of the most straightforward ways to map a network drive. To do this, open File Explorer, right-click on “This PC,” and select “Map network drive.” You will then be prompted to choose a drive letter and specify the path to the network folder you wish to map. Ensure you select a drive letter that is not already in use to avoid conflicts.
Understanding UNC Paths
A UNC (Universal Naming Convention) path is used to identify the location of a network resource. It typically starts with two backslashes followed by the server name and the shared folder name. For example, “\\server\sharedfolder” is a UNC path. Understanding UNC paths is crucial when mapping network drives as it allows you to accurately specify the location of the network resource you want to access.
Setting Persistent Drive Mappings
To ensure that your network drive mappings are persistent, you can check the “Reconnect at sign-in” option when mapping the drive using File Explorer. This setting allows the drive to be available every time you log into your computer. For command-line methods, using the `/persistent:yes` flag achieves the same result.
Method
Description
Persistent Setting
File Explorer
Map network drive through the graphical interface
“Reconnect at sign-in” checkbox
Command Line
Use the `net use` command to map a network drive
`/persistent:yes` flag
By following these methods, you can easily map network drives in Windows and ensure that they remain accessible across different sessions.
Command Line Methods for Mapping Network Drives
For users who prefer a more direct approach, command line methods offer a powerful way to map network drives. This section explores two primary command line interfaces: the traditional Command Prompt with the Net Use command and the more advanced PowerShell.
Using the Net Use Command
The Net Use command is a straightforward method for mapping network drives via the Command Prompt. To map a drive, open Command Prompt and type: net use Z: \\server\share, where “Z:” is the drive letter you wish to assign, and “\\server\share” is the UNC path of the network share. Press Enter to execute the command, and the drive will be mapped.
Command Component
Description
net use
The base command for mapping network drives.
Z:
The drive letter to be assigned to the network share.
\\server\share
The UNC path to the network share.
Using PowerShell to Map Network Drives
PowerShell offers advanced capabilities for mapping network drives through the New-PSDrive cmdlet. To map a drive, use the following syntax: New-PSDrive -Name "Z" -PSProvider "FileSystem" -Root "\\server\share" -Persist. The -Name parameter specifies the drive letter, -PSProvider must be set to “FileSystem,” and -Root contains the UNC path. The -Persist parameter makes the mapping persistent across sessions.
PowerShell’s flexibility allows for complex mapping scenarios and integration into larger automation scripts. To view or remove mapped drives, use the Get-PSDrive and Remove-PSDrive cmdlets, respectively.
Mapping Network Drives on Mac and Linux
While Windows users are familiar with mapping network drives, Mac and Linux users have their own methods to access network shares. Both operating systems provide robust features for connecting to and managing network drives, ensuring that users can access shared files and folders efficiently.
Connecting to Network Drives on macOS
On macOS, users can connect to network drives using the Finder. To do this, they should open Finder, click on “Go” in the top menu, and select “Connect to Server.” Here, they can enter the server address in the format smb://servername/share and click “Connect.” Users will be prompted to enter their credentials, including username and password, to access the shared resource.
Making Network Drives Persistent on Mac
To make a network drive persistent on a Mac, users can add it to their login items. After connecting to the network drive, they should go to “System Preferences,” then “Users & Groups,” and select their user account. Under “Login Items,” they can add the newly connected network drive. This ensures that the network drive is automatically mounted when the user logs in.
Mapping Network Drives in Linux (Ubuntu)
In Linux distributions like Ubuntu, users can map network drives using the default file manager, Nautilus. They can open Nautilus, click on “Other Locations,” and enter the server address in the “Connect to Server” field using the format smb://servername/share. After entering their credentials, the network drive will be accessible. For persistent connections, users can edit the /etc/fstab file to mount the network share automatically upon startup.
Troubleshooting Network Drive Connections
Troubleshooting network drive connections is crucial for maintaining seamless access to shared resources. When issues arise, understanding the right steps to resolve them can save time and enhance productivity.
Common Connection Issues
Users often encounter issues such as failed connections, incorrect permissions, or drives not mapping correctly. Common causes include network configuration errors, incorrect UNC paths, or authentication problems. Ensuring that the network path is correct and that you have the necessary permissions can resolve many of these issues.
Viewing and Managing Mapped Drives
To manage mapped drives, you can use File Explorer to view all connected drives. Simply opening File Explorer will display your mapped network drives. For more detailed management, using the Command Prompt or PowerShell with commands like net use can list and manage your connections.
Disconnecting Network Drives
Disconnecting a network drive is straightforward. In File Explorer, right-clicking on the drive and selecting “Disconnect” removes the mapping. Alternatively, using the Command Prompt with net use [drive letter]: /delete or PowerShell with Remove-PSDrive -Name “[drive letter]” achieves the same result. It’s essential to properly disconnect drives, especially on shared computers, to maintain security and resource management.
Conclusion
To summarize, mapping a network drive can significantly enhance your file access experience by making shared resources as accessible as your local files. We’ve explored multiple methods for mapping network drives across different operating systems, providing options for users of all technical skill levels. Whether you’re using Windows, Mac, or Linux, there’s a method tailored to your needs.
The File Explorer method offers a user-friendly approach for Windows users, while command-line options like Command Prompt and PowerShell provide efficiency for IT professionals. For those interested in automating tasks, PowerShell’s New-PSDrive cmdlet is particularly useful. You can learn more about automating network drive mapping using Group Policy in our detailed guide: Map Network Drives or Shared Folders Using Group.
By understanding and applying these methods, you can significantly improve your workflow and maintain reliable connections to network resources. Mapping network drives is a simple yet effective way to streamline file access and management, whether you’re accessing departmental files, collaborating on projects, or backing up personal data.
FAQ
What is the purpose of mapping a network drive?
Mapping a network drive allows users to access shared files and folders on a network, making it easier to collaborate and share resources.
How can I map a network drive using File Explorer?
To map a network drive using File Explorer, open File Explorer, click on “This PC,” and then click on “Map network drive” in the toolbar. Select a drive letter and enter the UNC path of the shared folder.
What is a UNC path, and how do I find it?
A UNC (Universal Naming Convention) path is a format used to identify shared resources on a network. To find the UNC path, navigate to the shared folder, right-click on it, and select “Properties.” The UNC path will be displayed in the “Location” or “Target” field.
Can I map a network drive using the command line?
Yes, you can map a network drive using the command line by using the `net use` command. The syntax is `net use : . For example, `net use Z: \server\sharedfolder.
How do I make a network drive mapping persistent?
To make a network drive mapping persistent, check the box that says “Reconnect at sign-in” or “Reconnect at logon” when mapping the drive using File Explorer. Alternatively, use the `/persistent:yes` option with the `net use` command.
What should I do if I encounter issues connecting to a network drive?
If you encounter issues connecting to a network drive, check your network connection, ensure the shared folder is available, and verify the UNC path. You can also try restarting your computer or checking the Event Viewer for error messages.
Can I map a network drive on a Mac or Linux system?
Yes, you can map a network drive on a Mac or Linux system. On a Mac, use the “Connect to Server” feature, while on Linux, use the `mount` command or a file manager like Nautilus.
How do I disconnect a mapped network drive?
To disconnect a mapped network drive, right-click on the drive in File Explorer and select “Disconnect.” Alternatively, use the `net use : /delete` command in the command line.
Network device management is vital for strong security and understanding your digital setup. Many networks have multiple connected devices that need careful monitoring. Sadly, about 50% of home users don’t know about network discovery features1. Knowing which devices are on your network is key to network security. Automated discovery tools help track and manage digital…
Computer networks form a complex system for digital communication. They’ve evolved from basic connections to global systems linking billions of devices. This progress began with ARPANET in the late 1960s. Modern networks integrate various components for seamless connectivity. These range from tiny networks for microscopic sensors to vast systems spanning countries. Each type meets specific…
Remote computer connectivity is vital in today’s digital world. It allows people to access computers across different networks with ease. Remote access solutions have grown by 25% yearly in remote work settings. To connect computers, you need to know about remote access tech. Windows is the top platform, used by 75% of desktop users. But…
In today’s rapidly evolving digital landscape, transition networks have become crucial for organizations to seamlessly integrate legacy systems with modern technologies. At the heart of these transition networks are network switches, devices designed to efficiently route data traffic between connected devices, ensuring optimal network performance and configuration. Understanding the manufacturers that produce switches specifically designed…
Remote access has revolutionised how professionals interact with digital resources across networks. It allows users to connect to computers from anywhere, breaking traditional geographical limits1. Modern strategies enable secure access to desktop computers via internet connectivity. Professionals can now manage tasks, retrieve files, and offer technical support from any location1. Remote access involves creating a…
Home network administration can be puzzling. If you’re at home, you’re the network admin for your computer system1. Windows often shows messages suggesting a separate network administrator exists1. Home users typically have full admin rights on their machines. The standard login account usually has complete control1. There’s no special network admin login; the admin account…