Guide on How to Map a Network Share for Windows Users
By
Mapping a network drive simplifies access to shared files and saves valuable time by providing a shortcut to files stored elsewhere.
This process involves assigning a drive letter to a shared folder on a server or another computer, making it easily accessible. For Windows users, this can be achieved by right-clicking ‘This PC’ in File Explorer and selecting ‘Map network drive‘. For more detailed information on setting up network sharing, you can refer to this step-by-step guide.
By mapping a network drive, users can streamline their workflow and improve collaboration. This guide will walk you through the process, covering the necessary prerequisites, different mapping methods, and troubleshooting tips.
Mapping network drives allows users to access shared files and folders as if they were local, streamlining workflow and collaboration. This process involves assigning a drive letter to a shared folder on the network, making it easily accessible through File Explorer.
What is a Network Share?
A network share is a folder or drive made accessible to multiple users on a network. When you map a network drive, you’re creating a shortcut that assigns a drive letter to this shared resource, allowing you to access it as if it were a local drive on your computer.
Mapping network drives offers several benefits, including easier access to shared resources, improved workflow efficiency, and simplified collaboration. By assigning a drive letter to a shared folder, you can access important files quickly, saving time and enhancing productivity. This approach also facilitates consistent file organization and allows you to work with network files using local applications.
Prerequisites for Mapping Network Drives
The initial step in mapping a network drive involves verifying your computer’s connection to the appropriate network. Ensuring you have the necessary network access and permissions is crucial for a successful connection.
Required Network Access and Permissions
To map a network drive, you must have the appropriate access permissions to the network share you want to map. This typically requires authentication with valid network credentials. It’s also essential to verify that the network path to the shared folder is correct and accessible. Incorrect paths will result in connection failures.
Important Considerations Before Mapping
Before attempting to map a network drive, ensure your computer is properly connected to the network where the shared resources are located. Consider whether you need the drive to reconnect automatically when you log in or if it should be a temporary connection. Additionally, be aware of security implications when mapping drives, especially when using different credentials or accessing sensitive information.
How to Map a Network Share
Mapping a network share is a straightforward process that enhances your productivity by providing easy access to shared files. The most common method for mapping a network drive is through File Explorer, which provides a user-friendly graphical interface.
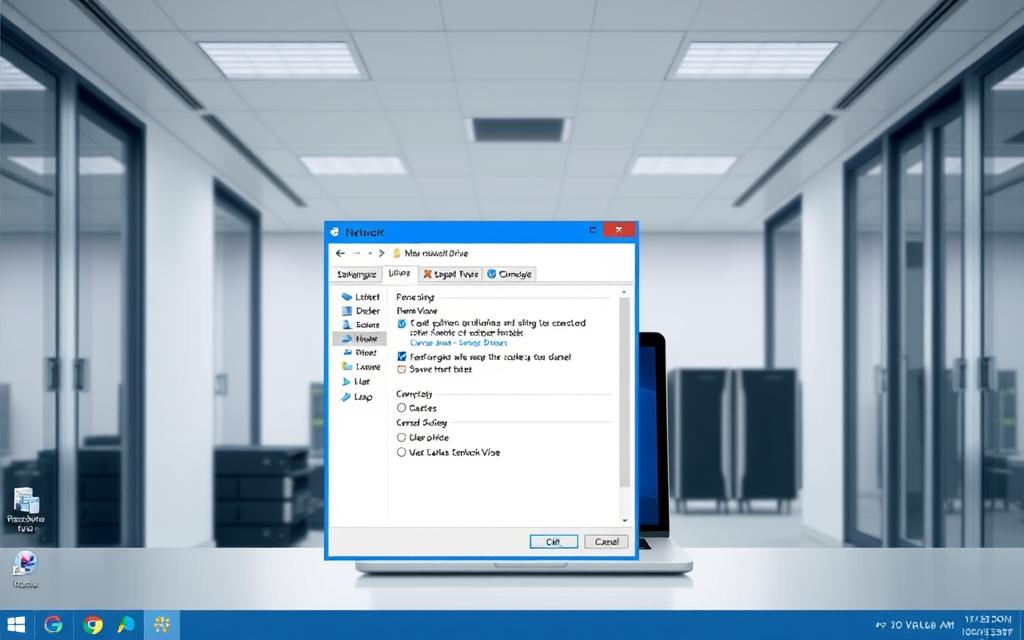
To begin, open File Explorer by clicking the folder icon in your taskbar or searching for it in the Start menu. Navigate to “This PC” in the left sidebar, then click on the “Computer” tab in the ribbon and select “Map network drive” from the options.
You’ll need to choose a drive letter for your mapped network share – letters toward the end of the alphabet (like X, Y, or Z) are commonly used to avoid conflicts with local drives. Enter the network path in the format \\server\sharedfolder or browse to locate the shared folder on your network.
Check “Reconnect at sign-in” if you want Windows to automatically reconnect to this network drive whenever you log in to your computer. If you need to use different credentials than your current Windows login, select “Connect using different credentials” and enter the appropriate username and password.
For users comfortable with command-line interfaces, Command Prompt offers a quick alternative using the “net use” command: net use [drive letter]: \\server\sharedfolder. PowerShell users can map drives using the New-PSDrive cmdlet with the syntax: New-PSDrive -Name “X” -PSProvider FileSystem -Root “\\server\sharedfolder” -Persist.
To disconnect a mapped network drive, right-click on it in File Explorer and select “Disconnect” or use the command “net use [drive letter]: /delete” in Command Prompt. If you encounter connection issues, verify your network connectivity, check that the path is correct, and ensure you have the proper permissions to access the shared folder.
Once mapped, you can work with files on the network drive just as you would with local files – opening, editing, and saving directly to the network location. This streamlined process enhances collaboration and productivity, making it an essential skill for both personal and professional environments.
FAQ
What is the purpose of mapping a network drive?
Mapping a network drive allows users to access shared files and folders on a remote server or computer, making it easier to collaborate and manage files.
How do I choose a drive letter for my network drive?
When mapping a network drive, you can choose an available drive letter from the list provided in the File Explorer. It’s recommended to use a letter that is not already in use by a local drive.
Can I map a network drive using the Command Prompt?
Yes, you can map a network drive using the Command Prompt by using the `net use` command, followed by the drive letter and the path to the shared folder.
What happens if I lose connection to the network drive?
If you lose connection to the network drive, you can try reconnecting by signing in again or checking your network connection. You can also configure the drive to reconnect at sign-in to ensure automatic reconnection.
Can I map multiple network drives on my computer?
Yes, you can map multiple network drives on your computer, as long as you have the necessary permissions and network access. Each drive will be assigned a unique drive letter.
How do I access the mapped network drive?
Once you’ve mapped the network drive, you can access it by opening File Explorer and navigating to the assigned drive letter. You can also access it from the Start menu or by typing the path in the Run dialog box.
Finding your local ABC on Dish Network is easier than you think. As a popular local channel, ABC offers a diverse range of programming, including reality TV, drama series, and family-friendly comedies, as well as local news and events. With various Dish Network packages available, you can choose the one that best suits your entertainment…
DISH Network offers a variety of channels, including local networks like ABC, as part of its satellite TV service. ABC is typically found on DISH channel 7 in most markets, though the exact channel number can vary depending on your location. With ABC, subscribers can enjoy a range of entertainment options, including reality TV, drama…
For sports enthusiasts, particularly those who enjoy college basketball, finding TruTV on Dish Network is crucial during the NCAA March Madness tournament. TruTV has become a vital channel for broadcasting key tournament matchups, making it essential for Dish Network subscribers to locate the exact channel number. This comprehensive guide will help you understand which Dish…
For Spectrum subscribers and football enthusiasts, finding the right channel to watch NFL Network can be a challenge. The NFL Network offers a wide range of exclusive content, including live game coverage, analysis programs, and special events like Thursday Night Football and NFL RedZone. To access this content, viewers need to know the correct channel…
A network security key is crucial for keeping wireless networks safe. It is the main password that allows devices to connect to the internet securely. This key can be a mix of 8-12 characters, biometric data, or a digital signature. It’s key for keeping your computer safe. By using a strong network security key, you…
In our world of teamwork, drive sharing is key for better work and getting to resources on a computer network. This text shows how to share drives well with Windows 7. It’s an OS that works great with the SMB protocol, making file sharing smooth across Windows versions like 7, 8, and 11. When many…